Showing posts with label slayer. Show all posts
Monday, June 18, 2012
Loser Machine
Went to the Loser Machine Sample Sale last Friday mornin'. Good times, good people, good clothes. Pretty funny, when I got there I saw a ton of people walking out with bags and bags of clothes and I thought, "Holy crap, there are a ton of people here. Am I gonna have to wait in line to get in?!?" I turned a corner and there I saw it, a ton of people waiting in a line as long as Splash Mountains' at Disneyland. I thought, "Seriously, who knew?" But then I soon realized, oh wait, seems Obey is having their sample sale at the same time and the same place and that long ole line if for them. I looked to the right and there in all its glory was the Loser Machine sample sale. I am happy to report, I walked right in. Even bought myself a tank top. On my way out I chatted with the Born Free peeps. Ah yes, Good Times!
Monday, May 14, 2012
New Seat!!!!!!
My new seat finally came today and I was so pumped to put it on! I ordered it off "eyay!" (if you know what I mean) and its an old factory tuck and roll 2up. I might get a solo down the road but I wanted something Christa and I can ride together on. I mean you gotta have your woman on the back of your bike. Plus I got a supa fly deal on it. Thank you eyay! and thank you guy in middle America for getting rid of such an awesome seat that you kept in such great condition just for me!
Here was my old factory pillow monster
Here is a side by side of the two
Here is with the old seat and then now the new seat. I also took off the pillow pad on the small sissy bar.
Here was my old factory pillow monster
Here is a side by side of the two
Here is with the old seat and then now the new seat. I also took off the pillow pad on the small sissy bar.
Friday, May 4, 2012
Internally Wiring the Bars Pt. 3-Gripped It & Ripped It
With the bars internally wired and all the electrical done up it was time to mount the bars, put the throttle back on, attach the throttle cables and then put the white grips on.
With the bars mounted and the control pods up I reattached the throttle cables
Here it is almost done. Here is just a note about the grips: The left side grip was super easy to slide on, no prob at all. However, the throttle grip was not so easy....
In order to get the new grip on the throttle, I had to roll off the old grip...not so bad, but then I could only get the grip half way on. So here is the tip: Go get some rubbing alcohol and rinse the inside of the grip with the rubbing alcohol, the shoot the smallest drip of WD-40 in with it, then slide that bad mofo on the throttle sleeve and let it dry, when it does, that bad boy will not be coming off.
With the new grips on I whipped up an oil/graphite concoction under the throttle sleeve to keep that throttle all lubed up. Then it was throttle cable adjustment time. Easy breezy. Got that snap back going real good.
Here it is all done...
Now onto the speedo and tach....
With the bars mounted and the control pods up I reattached the throttle cables
Here it is almost done. Here is just a note about the grips: The left side grip was super easy to slide on, no prob at all. However, the throttle grip was not so easy....
In order to get the new grip on the throttle, I had to roll off the old grip...not so bad, but then I could only get the grip half way on. So here is the tip: Go get some rubbing alcohol and rinse the inside of the grip with the rubbing alcohol, the shoot the smallest drip of WD-40 in with it, then slide that bad mofo on the throttle sleeve and let it dry, when it does, that bad boy will not be coming off.
With the new grips on I whipped up an oil/graphite concoction under the throttle sleeve to keep that throttle all lubed up. Then it was throttle cable adjustment time. Easy breezy. Got that snap back going real good.
Here it is all done...
Now onto the speedo and tach....
Labels:
1200,
1996,
biltwell,
control pods,
davidson,
friscos,
garage,
handlebars,
harley,
internally wire,
motorcycle blog,
motorcycles,
service,
slayer,
speedometer,
sportster,
tachometer,
white grips,
xl1200
Thursday, May 3, 2012
Internally Wiring the Bars Pt. 2
So when I left it last time, I had finally had some late night success so the next morning it was back to work. I still had the throttle side to deal with, wiring, master cylinder and throttle.
This time things went so much easier because of what I learned the previous night. So right off the bat I cut off the wire cover.
This way the wire covering won't bunch up in the 90 degree bend
Tied up the guitar string around the bundle of wires. This time I knew to divide the wires in to bundles of 3 wires.
And this time, super simple, out comes the wires not as big of a deal this time round
It was at this point that Christa Jayne brought me some delicious breakfast. I was so surprised and stoked!!!!! It seriously made my morning! Two eggs sunny side up on toast, too good!!!

As soon as I was done with breakfast I wired up the other 3 wire bundle and slide the wrap over and just like that the bars are internally wired!!!!!!!
Now I mocked up the bars in the bike just to check it out

Now that the bars are mocked up it was time to wire everything back up to make sure it works
Then was the moment of truth, I turned the key and pressed the started button....she fired right up!!!!! I checked all the electronics and everything seemed good except the hi/low beam. After wiring the first time I accidentally mis-wired the hi low beam of the head light but that was a quick and easy rewire. From there as you can see, thumbs up..all was good in the proverbial hood.
This time things went so much easier because of what I learned the previous night. So right off the bat I cut off the wire cover.
This way the wire covering won't bunch up in the 90 degree bend
Tied up the guitar string around the bundle of wires. This time I knew to divide the wires in to bundles of 3 wires.
And this time, super simple, out comes the wires not as big of a deal this time round
It was at this point that Christa Jayne brought me some delicious breakfast. I was so surprised and stoked!!!!! It seriously made my morning! Two eggs sunny side up on toast, too good!!!
As soon as I was done with breakfast I wired up the other 3 wire bundle and slide the wrap over and just like that the bars are internally wired!!!!!!!
Now I mocked up the bars in the bike just to check it out
Now that the bars are mocked up it was time to wire everything back up to make sure it works
Then was the moment of truth, I turned the key and pressed the started button....she fired right up!!!!! I checked all the electronics and everything seemed good except the hi/low beam. After wiring the first time I accidentally mis-wired the hi low beam of the head light but that was a quick and easy rewire. From there as you can see, thumbs up..all was good in the proverbial hood.
Labels:
1200,
1996,
control pods,
davidson,
friscos,
garage,
good times,
handlebars,
harley,
headlight,
internally wire,
motorcycle blog,
motorcycles,
signals,
slayer,
speedometer,
sportster
Sunday, April 22, 2012
Drillin' Out the Holes
Well, first I got out my drill and drill bits and figured I would start out by drilling some small holes and then bore them out to 1/2" holes. Seemed to make more sense then just trying to bore a 1/2" hole straight from the get go. Decided to do a practice run on my old bars before getting down to business with my new Biltwell's, seemed easy enough. I will say though that not having a work bench or vice or any sort seems to be making things a bit more complicated in terms of securing the bars for drilling, but I rigged up a nice little set up using a blanket, some old shocks (in boxes) and my good ole feet. Though drilling on round bars made it a wee bit exciting because one slip O' the drill and I got a hole in my foot.
Here is the practice holes...good enough for rock'n'roll
I then mocked up how I wanted to have the bars sit and yes those are my safety goggles for drilling. I learned REAL quick that eye protection was very much a necessity when drilling metal. Also here is what I did not show. After I mocked them up I used tape on the bars to mark where I was going to need to drill so that when I internally wired the pods back on they would sit properly and in the right space. Also then where the wires were going to have to exit out the bottom. This was not a good time and was actually kinda stressful ergo there are no pics because while one is frustrated, taking pics is the last thing you wanna do.
Ok so here is after I taped, marked and drilled the first holes. Looks good! However, I noticed that the Biltwell bars are made from some REALLY strong steel and thus drilling holes was ALOT harder than on the other bars that I had....literary scholars would call this foreshadowing....
Wait just a minute, there are no pictures for this but it bears to be mentioned: I HIT A BIT OF SNAFU. So as I am drilling I get to where I am boring out holes from size 5/16" to 3/8" and guess what!?! I could not bore it out!!!! It just would not work!!! The drill seemed inadequate to drill any bigger of a hole. The steel was just too strong and my drill and bit was not strong enough. So off to Home Depot I go. I upgrade my drill to a major hammer drill and buy some Cobalt drill bits to drill through heavy duty metal. I then get back home and start drilling again with my new Milwaukee heavy duty drill and bits....3/8" hole, no problem but when I them try and bore out to 1/2"....I SNAP THE DRILL BIT!!!!!! That is how hard this metal is, I snapped a cobalt heavy duty Milwaukee drill bit! So back to Home Depot I go....a bit annoyed thus no pics. I buy a couple new drill bits and return home determined to finish boring out these holes before it gets too late in the day and the neighbors begin to hate me.
Here I am drilling with my new drill and bits
Ah, success!!!!!
And to check the holes, here it was mocked up on the bike again
And it was here I called it a night!
Here is the practice holes...good enough for rock'n'roll
I then mocked up how I wanted to have the bars sit and yes those are my safety goggles for drilling. I learned REAL quick that eye protection was very much a necessity when drilling metal. Also here is what I did not show. After I mocked them up I used tape on the bars to mark where I was going to need to drill so that when I internally wired the pods back on they would sit properly and in the right space. Also then where the wires were going to have to exit out the bottom. This was not a good time and was actually kinda stressful ergo there are no pics because while one is frustrated, taking pics is the last thing you wanna do.
Ok so here is after I taped, marked and drilled the first holes. Looks good! However, I noticed that the Biltwell bars are made from some REALLY strong steel and thus drilling holes was ALOT harder than on the other bars that I had....literary scholars would call this foreshadowing....
Wait just a minute, there are no pictures for this but it bears to be mentioned: I HIT A BIT OF SNAFU. So as I am drilling I get to where I am boring out holes from size 5/16" to 3/8" and guess what!?! I could not bore it out!!!! It just would not work!!! The drill seemed inadequate to drill any bigger of a hole. The steel was just too strong and my drill and bit was not strong enough. So off to Home Depot I go. I upgrade my drill to a major hammer drill and buy some Cobalt drill bits to drill through heavy duty metal. I then get back home and start drilling again with my new Milwaukee heavy duty drill and bits....3/8" hole, no problem but when I them try and bore out to 1/2"....I SNAP THE DRILL BIT!!!!!! That is how hard this metal is, I snapped a cobalt heavy duty Milwaukee drill bit! So back to Home Depot I go....a bit annoyed thus no pics. I buy a couple new drill bits and return home determined to finish boring out these holes before it gets too late in the day and the neighbors begin to hate me.
Here I am drilling with my new drill and bits
Ah, success!!!!!
And to check the holes, here it was mocked up on the bike again
And it was here I called it a night!
Front End Electrical
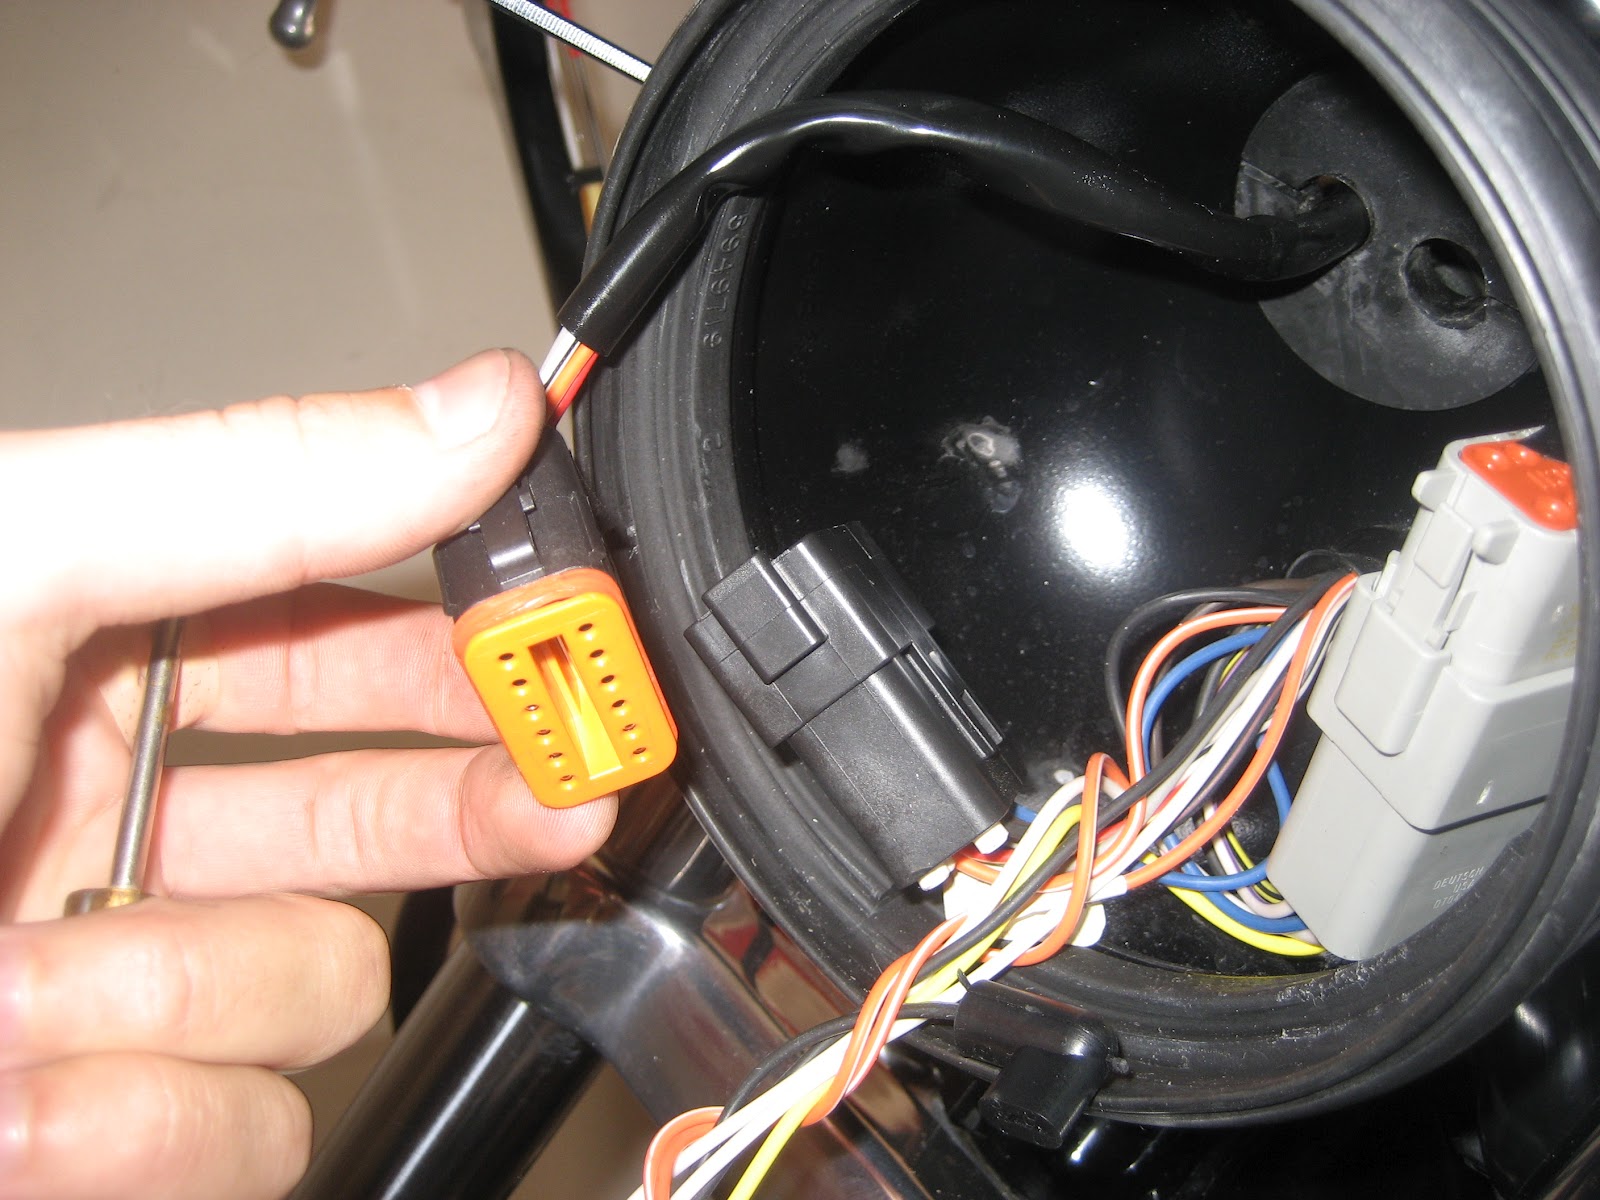
So first things first, I had to disconnect all the front end electronics going to the control pods on the handlebars. They are routed eternally and then they go into the headlight bucket and connect to the deutcsh connectors there. So I opened up the headlight and disconnected the wires there first. Then I pulled them out of the bucket and disconnected them from the bars. The clutch side was easy, but removing the throttle side is a bit trickier because in preparation for the new bars I have to remove the throttle as well...

See the throttle housing and the control pod are one and the same so removing the pod means removing the throttle so I opened it up
Removed the cables (was sure not to lose the brass ferrule on each one)
And off comes the throttle sleeve. As you can see I had to use the headstock of my bass as a make shift holder for the master cylinder/front brake
Taped off what was what so I would remember
Then I removed the bars and we are ready to begin drilling out the holes on the bars to ready them for internally wiring.
See the throttle housing and the control pod are one and the same so removing the pod means removing the throttle so I opened it up
Removed the cables (was sure not to lose the brass ferrule on each one)
And off comes the throttle sleeve. As you can see I had to use the headstock of my bass as a make shift holder for the master cylinder/front brake
Taped off what was what so I would remember
Then I removed the bars and we are ready to begin drilling out the holes on the bars to ready them for internally wiring.
Labels:
1200,
1996,
connector,
davidson,
deutcsh,
garage,
good times,
handlebars,
harley,
headlight,
how to remove control pods,
motorcycle blog,
motorcycles,
service,
slayer,
speedometer,
sportster
Subscribe to:
Posts (Atom)